RESTful API using Flask with Server Side Authentication and Authorization via Google Login using OAuth2.0
#
Description #
While going through some past projects I decided I wanted to revisit a RESTful API general inventory project I built about a year and a half ago. The project was build using Flask and hosted on GCP and RESTfully implements whatever custom schema is designed for the database. Users have to be authenticated and authorized before they gain access, and the API handles multiple errors with the proper responses. The API accepts properly formatted JSON requests that provide authorized user credentials via a user_ID and a JSON Web Token. I used Postman to access and test it when I first built it. Besides deciding I wanted to refactor the code and perhaps built a front end for it, I found some older diagrams of how I thought the authentication and authorization would work for the app from the time around the start of the project. I decided I would make a new diagram of the flow prior to refactoring the current code to fix some issues in the older diagrams and reacquaint myself with the server access flow in the app. An older diagram can be found at the bottom of the post.
One of the original goals of the project was to better solidify my understanding of authentication and authorization steps and how to use them to allow an outside client tool, such as Postman, to use one of my projects. I chose Google's array of services and APIs to control database API access since it is widespread and easily recognizable as well as allowing fine grain permissions to be requested of the user. Besides being familiar to most users, the Google Login path gave access to incremental scope requests and consent is easy for users to revoke. The app was run in App Engine on Google Cloud Platform and the database the API accessed was a NoSQL structure stored in Firestore in Datastore mode on GCP. Utilizing Google's APIs to assist authentication, authorization and authorization token verification streamlined the process. OpenID Connect, an authentication layer built on top of OAuth 2.0, was the authentication protocol used via Google People API to interact with Google Login to get user content and identity verification from Google. OAuth 2.0 was used for authorization, this time through Google's Cloud Identity service to generate the OAuth 2.0 JWT token (cryptographically signed by Google, in this case). It only made sense to chose to use Google's OAuth 2.0 verify service to make sure the token was valid, including proper signature, not expired, etc.
More details on the RESTful inventory API: It can be implemented to grant custom CRUD ability to users following whatever schema is needed by the client. For example, it was tested as a marina which would have slips which could be in use or not in use, the boats could have ownership data attached, fees, etc. Users could have multiple boats and couldn't access boats they didn't own. The API was then reconfigured to represent a general inventory database for a bicycle shop, allowing the user to create new bicycles, remove sold bicycles, update the prices of the bicycles, as well as track customer data, repairs, employees, and inventory. For example, a bicycle coming in for repair that needs new tires could come in and be tagged with a date received, date due, estimated cost, customer info, mechanic assigned to the repair, etc. Once finished, the bicycle could be updated with the new info and the customer easily informed. An employee user could attach inventory items such as the new tires to the bicycle, removing them from free inventory and adding them to the repair cost from one place. For testing, the current API code treats all valid users as having full CRUD access. However, user groups can be configured and controlled either by creating different IAM access roles using the Admin API or by having the app request permission from the administrator before being granted access.
Table of Contents #
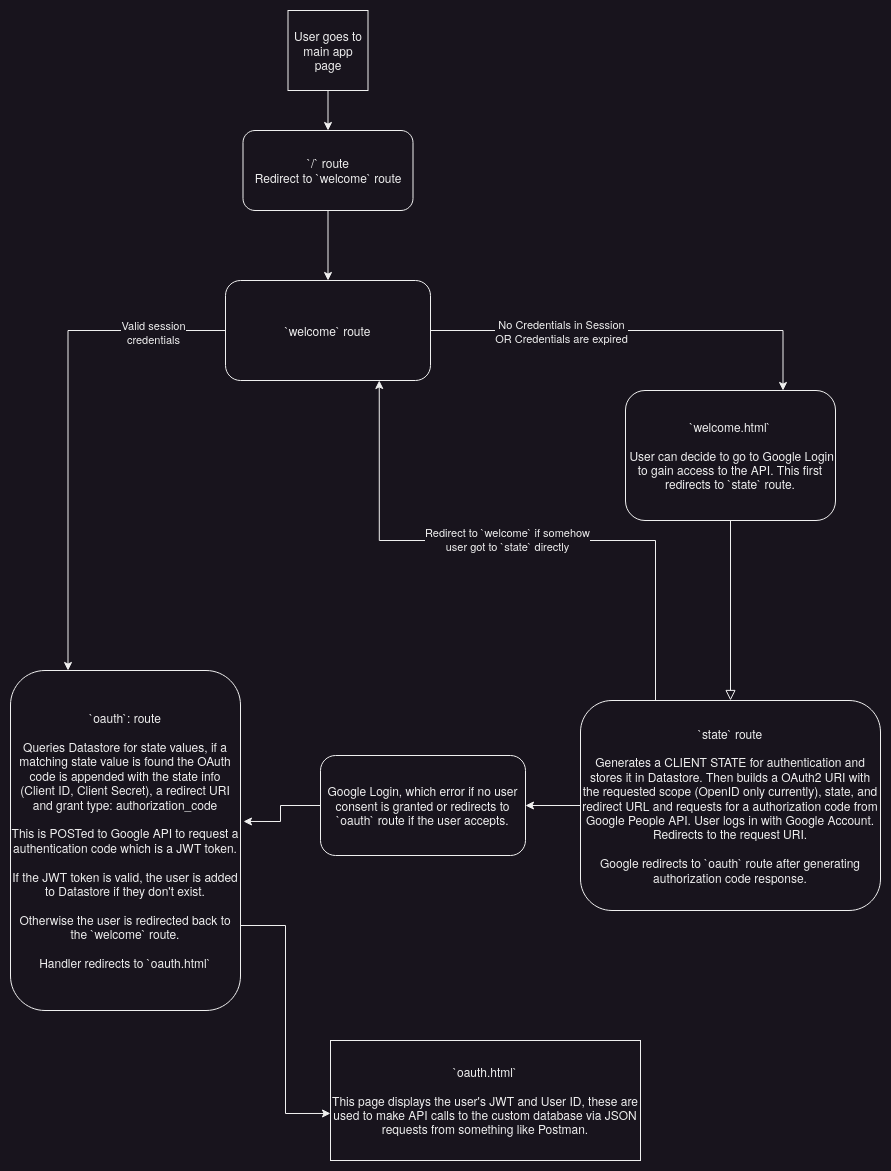
Diagram #
Steps #
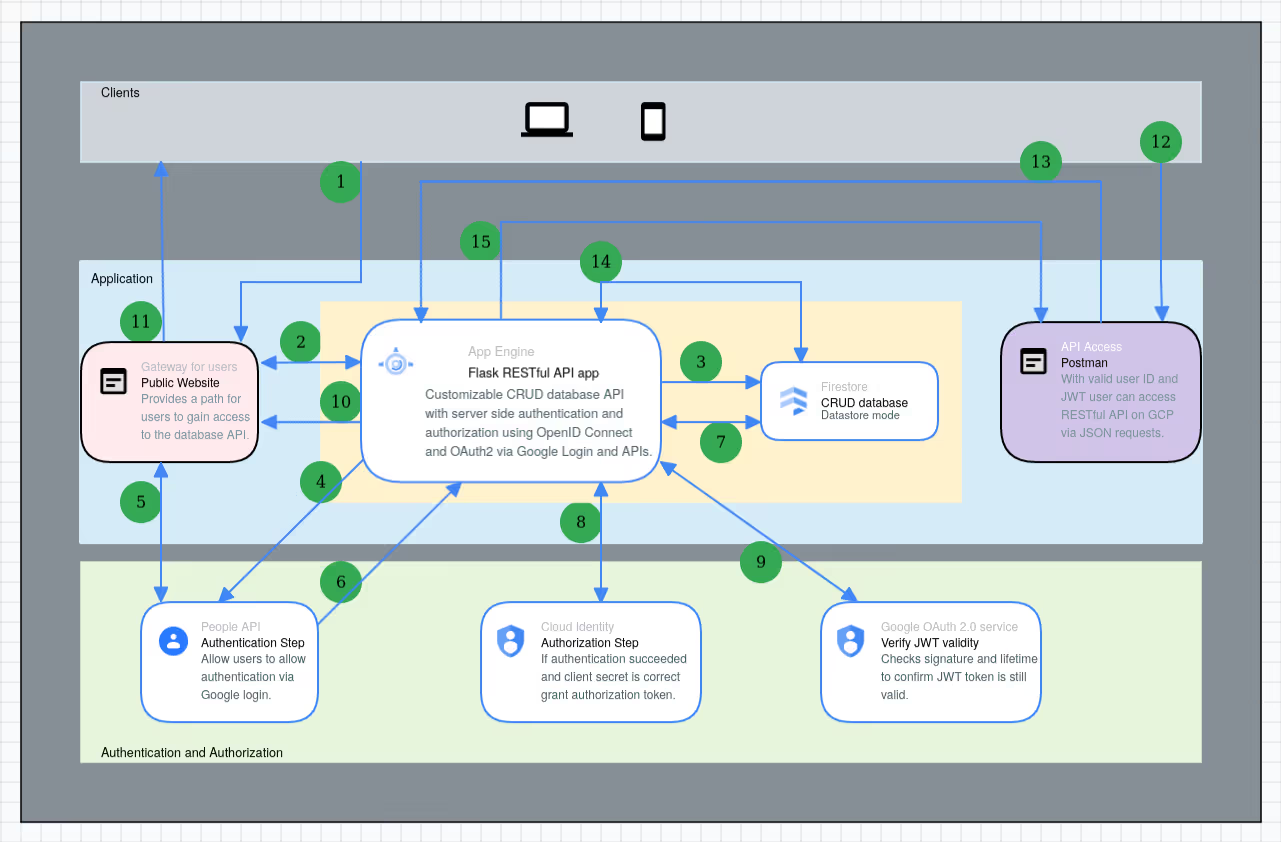
Step 1: User goes to the public welcome page for the app in their browser to gain access.
Step 2: If the user has good credentials in their session data they are redirected to the oauth page (step 10) which shows their JWT and user ID.
Otherwise the app continues to step 3. In the diagram the server is Flask based and running in App Engine on Google Cloud Platform.
Step 3: The server generates a unique state code shared between the client and server. The server stores this in the database in Datastore. Google calls this an anti-forgery state token and they are also known as cross-site request forgery tokens.
Step 4: Next the server builds an authentication request sent to OpenID Connect via the Google People API containing client_id, scope requested, client state code and the redirect_uri. This is sent to Google as an HTTPS GET request.
Step 5: User then sees a prompt from Google in the browser asking if they want to allow the requested scope to the app and decides to allow or not allow these permission to the app. This is the user consent step. The user can revoke this consent at any time from their Google Account.
Step 6: Google redirects the user back to the App and sends a response to the specified endpoint at the server. If the user did not permit access, Google will return an error.
Step 7: If the user allowed the requested permissions, the response from Google contains the original client state code and a one time authorization code that will be used to produce a JWT authorization token. The server verifies that the state code (cross-site request forgery token) provided by Google matches the original state code the server generated by retrieving it from the Datastore. If the state codes don't match, or if the user declined to authenticate, they are redirected back to the starting "welcome" page. If the state codes match, the user is considered authenticated via Google by the app and this state code is deleted from Datastore database.
Step 8: The app then forms a POST request containing the one time authorization code, the client_id, and client_secret, the redirect_uri and the grant_type parameters for an authorization code per OAuth 2.0 specification. This is sent to Google Identity via the Google OAuth2 API. Google verifies the code and responds with a authorization token, also known as an ID token, which is a JSON Web Token (JWT) which is a signed Base64-encoded JSON object.
Step 9: The JWT is sent to Google OAuth2.0 service by the server to validate the signature, issuer validity, that theexpiration time is valid and so forth. If Google validates it, a unique claim or field from the token, named sub, is extracted to be used as the user's unique user ID for accessing the CRUD API. This verification process is repeated with the JWT every time an API call is made, such as retrieving, updating or deleting data on the server, however the user's unique ID doesn't change after initial issue. Tokens have a finite lifespan before they need to be refreshed. User can revoke consent at any time via their Google Account. The unique user ID is stored in the database in Datastore by the server.
Step 10: Once the JWT has been verified the first time, and the unique user ID have been extracted the server redirects the client's browser to a oauth page which displays the user's unique ID and JWT.
Step 11: The user can copy these credentials to access the CRUD API and manipulate the database. If the JWT expires or permission is revoked access will be lost until these are rectified, but the data in the database won't be lost. The requests to the API must be sent in JSON format, and the JWT token is expected to be sent within an Authorization request header. HTTPS can be enforced for these requests. Additionally, the API will handle and respond to the client with status codes including 200 OK, 201 Created, 204 No Content, 400 Bad Request, 401 Unauthorized, 403 Forbidden, 404 Resource Not Found, and 405 Method Not Allowed as appropriate to requests.
Step 12: A user can use the credentials to make API calls with any program that can properly format the JSON requests and pass the JWT token and user ID to the correct operation paths for the API, such as Postman. The API has use case specific customized entity routes. For example, a bicycle shop may use it to maintain it's database of bicycles, using the API to add new bicycles, reprice current bicycles, and remove sold bicycles. Entities can be expanded extensively. The bicycle shop may also maintain repair bills, inventory, rentals or customer information with whatever scope of operations are needed as described at the beginning of the post.
Step 13: For example, the user requests to update the price of an item in the database at the correct route location. This goes from Postman in this example via HTTPS to the server. The server validates the JWT token first, if this fails a 401 response code and a message saying the token failed validation is returned. Next it checks for JSON formatting and that the request expects a JSON response. Other errors in the request are handled similarly.
Step 14: If the request succeeds then the server accesses the database in Datastore and makes the change.
Step 15: A verification that the request succeeded is sent back in JSON format with a 200 or 201 status code to the user from the server as appropriate. The user can repeat this process as much as needed while the authentication and authorization are permitted and valid.
Old Diagram #